


")


When you’ve ridden about 1,000 miles in your bike, it’s time to take a detailed take a look at your cassette. (The quantity of wear and tear will fluctuate drastically relying on the situation of your chain and the place you trip – mountain vs. highway, for instance.) If the enamel in your most-frequently used cogs look extra like shark fins than the rounded humps of your little-used cogs, it’s time to switch the cassette.
Typically it’s attainable to switch particular person cogs as an alternative of the entire cassette, however not all cassettes have substitute elements, and it’s usually higher to switch your complete factor. Ask your native bike mechanic what’s greatest on your bike.
Store fitnessinf’s collection of bike cassettes.
Video: Methods to Exchange a Cassette
Verify Your Bike’s Hub Sort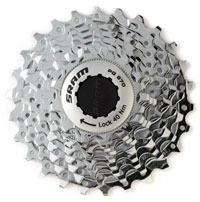
The next steps for eradicating your cassette assume that you’ve got a cassette freehub. Most trendy bikes have this model hub. To verify your hub sort, take away your rear wheel from the bike and look close to the smallest cog on the cassette. In case you see a lockring sitting outdoors the smallest cog (it should sometimes be marked with the phrase “lock”), then you’ve gotten a cassette freehub.
Instruments for Altering a Bike Cassette
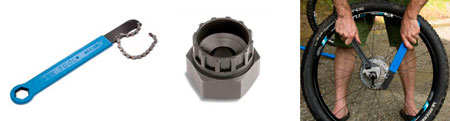
The lockring is designed to carry the cogs of the cassette in place on the hub. So as to take away and substitute your cassette, it’s essential unscrew this lockring. You’ll want three instruments to do that: a series whip, a cassette lockring remover and a big adjustable crescent wrench.
Eradicating a Bike Cassette
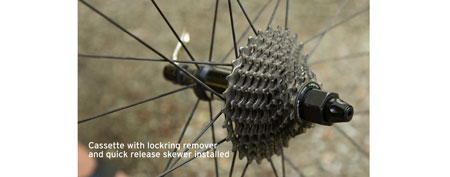
After you’ve gotten eliminated the rear wheel out of your bike, take away the fast launch skewer from the wheel. Then, insert the cassette lockring remover into your cassette and switch it till it seats; it should solely seat in a single place. If a normal cassette lockring remover doesn’t suit your cassette, ask a motorcycle tech for one that may.

To carry the lockring remover cosy to the cogs, take away the springs out of your fast launch skewer after which fitnessinfnsert the skewer again by way of the wheel and the cassette lockring remover and tighten.
(In case your bike has a via axle that screws into the bike body, fairly than a normal quick-release, you may thread the axle by way of the lockring remover. It will hold all of the items of the cassette so as whenever you take away the cassette, nevertheless it gained’t help you lock the items of the cassette along with the lockring remover.)
Stand behind the wheel (with the wheel vertical and the tire on the bottom), and drape the chain whip over one of many bigger cogs within the cassette so you may maintain the deal with along with your left hand. Modify your giant wrench to suit the surface of the lockring remover, and maintain it along with your proper hand. The chain whip will stop the cassette from spinning whilst you use the wrench to unscrew the cassette lockring.

Press the wrench and the chain whip handles in reverse instructions. As soon as the lockring is unfastened, launch the chain whip and the wrench, and proceed to unscrew the ring by twisting the lockring remover by hand or with the crescent wrench.
Take away the lockring after which slide the cassette off. Take away the cassette fastidiously should you intend to reuse any elements or items—the cogs and spacers typically come aside.
Putting in a Bike Cassette
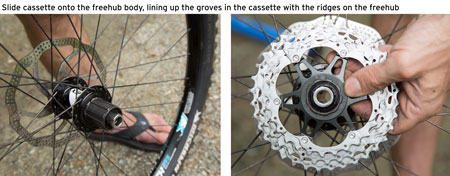
Slide the brand new cassette onto the freehub physique. (If you purchase your new cassette, be sure that it’s a appropriate model along with your bike’s hub.) There are grooves within the cassette that line up with ridges on the freehub, so the cassette will solely go on in a single orientation. The formed aspect of the cog enamel ought to be dealing with away from the bike, and the dimensions markings will nearly at all times face outward.
Make it possible for every cog in your cassette both has a built-in spacer, or that you just place a spacer between each cog (spacers include a brand new cassette). After getting the cassette assembled, take a look at the cogs to ensure all look like spaced the identical.
When all of the cogs and spacers are on, verify that the smallest cog stands barely pleased with the freehub physique; if it doesn’t, you’ll have missed a spacer.
Now, rethread the lockring utilizing the lockring remover device, and switch the lockring device clockwise with an adjustable wrench to tighten (however watch out to not overtighten). Then, when you have a torque wrench and the proper adapter, tighten to the producer’s specs (if not, go to your native bike store and have them do that half for you).
Exchange the fast launch skewer with the small a part of the conical springs dealing with inward. Reinstall the wheel in your bike and shift by way of the gears to ensure the whole lot works accurately earlier than driving.
Bike Cassette and Chain Upkeep
Totally clear your cassette a minimum of a pair instances per 12 months. Take care when cleansing across the hub. Don’t hose the hub down or use solvent to wash it as it’s possible you’ll dissolve grease within the bearings. See our article, Bike Upkeep Fundamentals, for extra ideas.
It’s additionally a good suggestion to switch your chain whenever you change your cassette. (Chains put on quicker than your cassette, so it is probably you may undergo a pair chains earlier than it’s essential substitute your cassette.) Cassettes and chains should be appropriate with one another. For instance, when you have a 9-speed cassette, you want a 9-speed chain.
Poor chain situation can put on down your cassette enamel quicker than traditional. In case you stay close to the seashore the place sand can get into your drivetrain, or should you stay in a moist setting the place your chain will get rusty, it’s smart to proactively substitute your chain. For the way-to particulars, learn our article, Methods to Change Your Bike Chain.

