


")


In case you put a whole lot of miles in your bike, the components will ultimately put on out. After many miles, a motorcycle chain will “stretch” and must be changed.
Technically, the chain isn’t stretching, however fairly the pins that be a part of the hyperlinks are carrying down, which causes the size of the chain to develop. A stretched chain expedites put on in your bike’s cassette and chainrings, so it’s a good suggestion to interchange your chain if you discover vital stretch, or each 750 to 1,000 miles. It’s less expensive to interchange a sequence than a cassette or chainrings.
You may as well use the next data when repairing or shortening an present bike chain.
Store fitnessinf’s collection of bike chains.
Video: Exchange a Bike Chain
Bike Chain Components and Instruments

Chain put on device: A typical chain put on device hooks over one curler (or pin) in your chain whereas the opposite finish inserts within the opening between two rollers. Numbers on the device will point out how worn your chain is and whether or not it’s time to interchange your chain.
New chain: Chains are speed-specific. So, for instance, you probably have a 9-speed bike, purchase a 9-speed alternative chain. Increased-end chains embrace particular coatings that delay rusting, or are constructed from stainless-steel fairly than common metal.
Substitute Pin or Grasp Hyperlink: New chains will include both a brand new pin, or a specialised hyperlink known as a grasp hyperlink, to attach the 2 ends of the chain collectively. In case you are repairing an present chain, you should buy alternative pins or grasp hyperlinks individually—they need to be appropriate together with your chain velocity and model.
 Chain device: In case you have a chain with customary hyperlinks, you will have a appropriate chain device that permits you to simply take away an outdated pin and insert a brand new one when breaking and reconnecting your chain.
Grasp hyperlink pliers: In case you have a sequence that connects with a grasp hyperlink, you’ll recognize these pliers that simplify the method of disconnecting and reconnecting the grasp hyperlink.
Examine a Bike Chain
To verify your chain for extreme stretch, use a sequence put on device. Hook one finish over one curler (or pin) in your chain. The opposite finish will both come to relaxation on high of the chain or it is possible for you to to insert it within the opening between two rollers. If it drops between the rollers, it means your chain is stretched and must be changed.

Chain put on instruments have stamped-in numbers indicating how worn your chain is. A studying of zero.5 to zero.75 means it’s best to change your chain. A studying of zero.75 or larger means you not solely want to interchange your chain, however you also needs to verify the situation of your cassette and chainrings to see if the stretched chain has prompted extreme put on to those components.
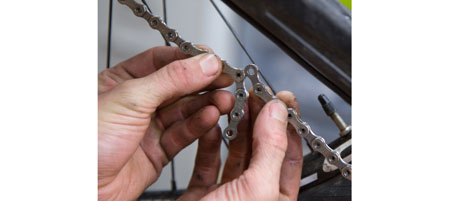
One other technique to verify for chain stretch is to measure the chain with a ruler or tape measure. On a brand new chain, 12 full hyperlinks (measuring from pin to pin) will measure precisely 12 inches lengthy. If the 12 hyperlinks measure 12 1/eight inches or extra, you’ll want to change the chain.
Take away a Bike Chain
To take away the chain from the bike, you’ll want to disconnect the chain, which can be known as breaking the chain. There are a pair strategies to do that relying on whether or not your chain has a grasp hyperlink or not.
Earlier than you start, shift your chain to the smallest chainring and smallest cog. Even higher, take away the chain from the entrance chainring or take the rear wheel off the bike. Both technique will take away stress from the chain.
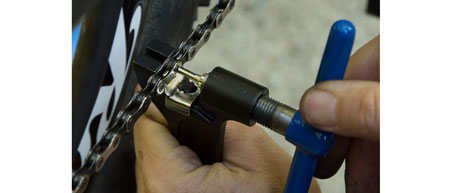
In case you have an ordinary chain with no grasp hyperlink: Seat the chain within the chain device, with the pin of the chain device aligned with a pin within the chain. Flip the deal with of the chain device till you push the pin out far sufficient that you would be able to break the chain.
In case you have a sequence with a grasp hyperlink: To seek out the grasp hyperlink, search for a hyperlink that appears considerably totally different when considered from the facet. That is the place you’ll break the chain.
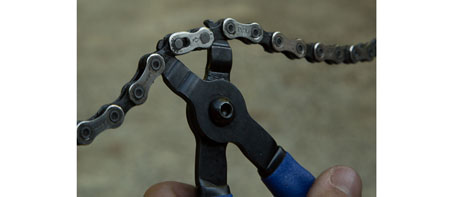
The grasp hyperlink has a pin on one facet that inserts right into a notch on the opposite facet. Use grasp hyperlink pliers to squeeze the grasp hyperlink pins towards one another, so you possibly can then pop the hyperlink open.
Figuring out New Bike Chain Size
Normally a brand new chain out of the field will probably be too lengthy to your drivetrain, so that you’ll have to shorten it by eradicating hyperlinks. There are a pair strategies to do that.
One of the best and best technique to decide your new chain size is to put it down subsequent to your outdated chain. Then, shorten your new chain to match the outdated (double verify by counting the hyperlinks).
One other manner is to run the chain by way of the entrance derailleur and drape the chain over the massive chainring in entrance and the massive cog in again. Don’t move the chain by way of your rear derailleur but. Deliver the 2 ends of the chain collectively and pull them tight. The proper size for the chain is the purpose the place the chain meets, plus two full chain hyperlinks (or 1 in.) of overlap (you should have an extra half hyperlink on the finish the place you’ll join the chain).
(Word: Many full-suspension mountain bikes use a design that strikes the rear axle additional away from the underside bracket because the bike cycles by way of its suspension; this is called “chain progress.” To accommodate for this chain progress, you will have to totally compress the rear suspension when utilizing the above technique.)
Earlier than eradicating the additional hyperlinks, make certain the 2 remaining ends of the chain will join to one another: A sequence can solely be joined by connecting the outer plate of 1 hyperlink to the internal plate of the connecting hyperlink. Take away the additional hyperlinks utilizing a sequence device.
Putting in a Bike Chain

Now it’s time to string the chain by way of the rear derailleur and reconnect it. Pay explicit consideration to ensure you thread the chain correctly by way of the pulley wheels on the rear derailleur.
Utilizing a sequence pin: In case your chain doesn’t have a grasp hyperlink, use a sequence device to reconnect the chain with the chain pin included together with your new chain.
In case you are repairing an present chain, at all times use a brand new chain pin fairly than reusing an present pin. Your new pin must be appropriate together with your chain velocity and model.
With most new chain pins, you insert them half manner utilizing a sequence device, then snap off the protruding finish of the pin with pliers.

Utilizing a grasp hyperlink: In case you’re reconnecting your chain with a grasp hyperlink, insert half of the grasp hyperlink onto every finish of the chain, pull the ends collectively, assemble the grasp hyperlink and use a grasp hyperlink device to snap the hyperlink into place.

It’s attainable to hyperlink a grasp hyperlink with no device. To take action, assemble the hyperlink and pull the perimeters of the chain away from one another to lock within the grasp hyperlink as finest you possibly can. Then launch the derailleur clutch you probably have one, flip your pedals in order that the grasp hyperlink is on high of your drivetrain, and together with your brakes engaged, step on one pedal laborious, tensioning the chain and clicking the hyperlink into place.
Store fitnessinf’s collection of bike chains.
Chain Upkeep
In case you reside close to the seaside the place sand can get into your drivetrain or for those who reside in a moist atmosphere the place rain routinely flushes away your chain lube, making your chain rusty, hold a more in-depth eye on the situation of your chain. Each could cause your chain to wear down quicker. See our article, Bike Upkeep Fundamentals, for extra ideas.

